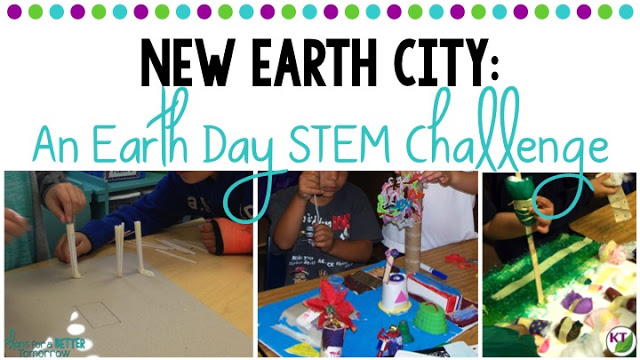
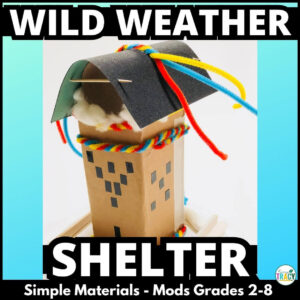
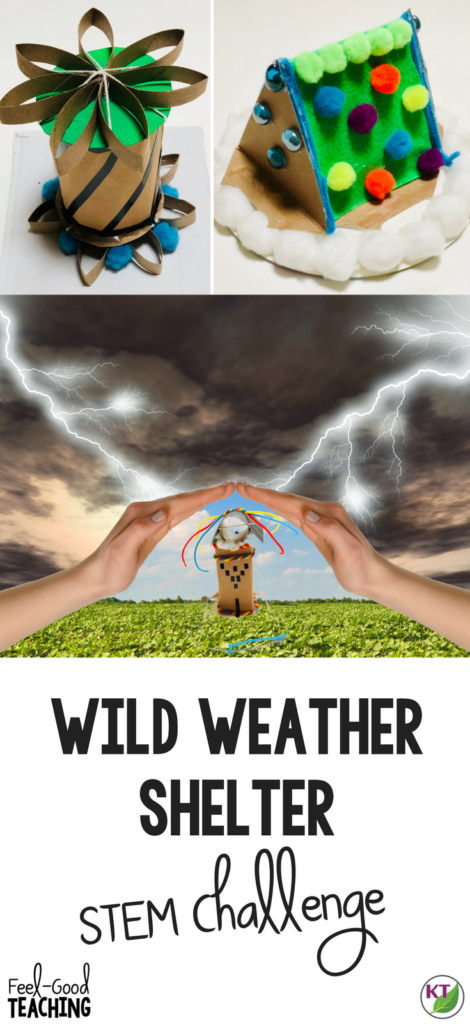
Looking for a great weather or natural disaster activity? In this STEM Challenge, students will create a custom shelter to defend against three or more weather and/or disaster events. Your students are going to go wild over this one! The testing phase is loads of fun and there are soooooo many ways to modify the difficulty!

Video Walkthrough
This challenge is a lot easier to show than to write, but if you’d like to see it written out, a transcription is provided at the end of this post.
Materials
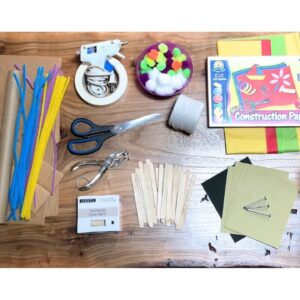

See full materials list here.
Post-Build Advice Bonus Content
Watch for tips on what to do immediately following the build phase:
Measuring Results Bonus Content
Watch the video below for more test information and demonstrations.
Credits:
Music:
“Cheery Monday” Kevin MacLeod (incompetech.com)
Licensed under Creative Commons: By Attribution 3.0 License
http://creativecommons.org/licenses/by/3.0/
Clipart:
The Cher Room
Sonya DeHart Design
SAVE SOME TIME!
In the video, you’ll get all the basics and more to run this challenge. In the resource, I’ve put together all the design analysis, extension templates, and given you even more extensions from which to choose. I can tell you, it was a LOT of time and effort put into this labor of love! Why not skip all the heavy lifting and treat yourself to a challenge that’s ready to print & go?! You’re worth it! 🙂

Transcription of Video Walkthrough (below image)
PIN ME!
Hi, I’m Kerry from Feel Good Teaching and today is the very best day of the week: STEM challenge day. Today is extra special, because this is challenge #52, which means there is officially a STEM challenge for every week of the year. This one is called, “Wild Weather Shelter,” and it was developed as part of the Planetopia Project series, but it can also be used as a stand-alone challenge. I’m going to tell you all about it, just after the materials and the STEM challenge cycle.
This is the STEM challenge cycle you should follow for every challenge. I’ve defined each step in another video. You’ll find a link to that video in the description below. Now, remember, you do not need to get all of the materials that are shown in the photograph, you just need to select a subset based on your preferences and depending on what types of weather you are having your students build shelters for.
If you’re familiar with the Thanksgiving Protect the Pilgrims STEM challenge, you might be wondering how this one is different.
Excellent question! And the short answer is, while both challenges do involve building a shelter, in Protect a Pilgrim, the focus is on specific weather elements the Pilgrims would have faced and the extensions focus on, again the Pilgrims, as well as things like physical properties. In this challenge, we’re broadening our focus to other types of weather, including extreme weather and even natural disasters. The criteria and constraints list are entirely different as well as the extension activities.
So, even if your students did the Protect a Pilgrim challenge, they’re going to find this one to be quite different.
Criteria & Constraints
In this challenge, students are going to be designing a shelter, custom built to defend against three types of weather and or natural disasters. You can have them select from a list, create their own, or even assign them the types you want them to focus on, and if your students are doing this as part of the Planetopia series, you’ll want them to select a combination of Earth examples, and even create some made up Planetopia weather and disasters.
You’re also going to want to add a criterion that allows you to do the type of testing you need for that weather. I’ll give you some examples of tests in a bit, but in order to accomplish this, we have to be able to get access inside of the shelter. So, you might require that the roof be removable, or that you can lift the shelter off the foundation and take a peek inside to check for damage. If that sounds a little too intense for your students, you can either skip wet weather tests entirely, or have students place the paper samples inside shelters and build semi permanently around them, then run all your tests and carefully dismantle the structures at the end to assess damage.
In addition to time and materials, you want to throw in a constraint restricting the size of the design so that it will fit inside a tray or a plastic bin for what your testing to make it a little less messy. Do you want to make this a little easier for younger students? Have them design for one specific type of weather. You can also give them additional materials to work with and more time. Before students start their design, you will need let them know how you’re going to measuring results for each type of weather, so they can design accordingly.
For example, if there is going to be a flood, half and inch of water versus two inches of water, well, that’s very different and it’s going to result in some very different designs. Another constraint is that during testing, students are not allowed to actually touch their shelter, but they may hold down the foundation.
Increase Difficulty
If you want to add some difficulty, have students design for four or more types of extreme weather or natural disasters. You can also ask them to build to scale or to add in some green features to make the house more energy efficient, or self-sustaining, and if your students did the Planetopia parcels challenge, have them harvest at least half of the materials used in their shelters from their parcels of land. There are also ways to adjust the difficulty in the way that you measure results. More on that later.
Measuring Results
So, one of the reasons the base criteria od this challenge focuses on just three types of weather disasters really is about the time constraints in your day, when you get to measuring results, you’ve got to measure each type of weather. So, if you choose to do four or more, you might just have to break the testing into separate class periods. Before students start testing, you’ll also want to have them trace around the perimeter of their structure so that they can assess damage. For example, if wind causes the shelter to shift off of it’s foundation, then some damage has occurred, and that’s a lot easier to determine if we have the perimeter marks ahead of time, and keep in mind, some of your weather and disasters are going to be more destructive that others. So, you’ll want to order your tests accordingly, and consider involving your students in determining the most logical order of testing.
As I mentioned before, you can do quite a bit to modify the difficulty in the way that you’re measuring results. For example, if you’re testing for the protection against the sun’s harmful rays, a simple test would be to hold the designs or even just the base materials up to a light source, and as long as it casts a shadow, you can count that as success. A more intense version would involve giving each group two thermometers. One would be placed inside of the structure and one would be placed outside of it. You might judge success based on the internal temperature being lower than the external, or you may choose to select a threshold.
For example, the interior temperature needs to be at least 15% lower than the external temperature, and if you choose to do that latter test, remember to put in the criteria and constraints something about the size of the thermometer so that the students can be sure their structure can contain it. Students will give their shelter success rating on a scale of one to three for each type of weather or disaster. Younger students can use whole numbers and older students can use decimals out to the tenths or hundredths place. Now, rather than telling the students how each type of weather or disaster will be tested, you might consider having them trying to develop their own fair and practical tests, and of course that will be necessary for anything they might make up for the Planetopia series.
Extensions
As always, there are plenty of extension options. Obviously, this great for any of your weather or natural disaster lessons: weather tools, weather forecasting, causes and effects of severe weather or natural disasters, weather versus climate, climate change, the water cycle, endless possibilities. Have students create pros and cons lists for each design in the class. You can even have them award superlatives. You can have them vote for which of the designs they’d like most to live in. Have students list what materials would be used if they were to build this structure in real life. From there, they can determine which of those are natural resources. Are they renewable or non-renewable?
If you want to throw in a little bit of ELA, have students write postcards inviting family members to come and visit them and their shelters, or telling them about how their shelter protected them from a recent storm, and there are a lot of extra ideas in the resource. You’re ready to this challenge in your class, on your own, but this resource is so full of goodness, you’re going to want to check it out. It is ridiculous. This resource contains everything you need to guide your students through the Wild Weather Shelter Challenge, including modifications for use for second through eighth graders. You’ll still need to gather materials, of course, but the rest has been done for you.
Resource Description
You’ll get Next Gen Science Standards, links to my STEM challenge how-to videos to help you get the most from each challenge and the shelter materials list. In teacher tips, you’ll fine preface and set-up, how to increase or decrease difficulty through the criteria and constraints list, measuring results, pull any of cross curricular extension suggestions, and a post filled questions list. You’ll find two editable criteria and constraints lists, so you can tailor the challenge to your students. Plus: student planning pages. For design analysis there are two versions, four page expanded room for response for younger students, and a two page condensed space paper saver version. You’ll also find a set of group discussion questions. In the extension handouts, you’ll find a shelter ratings activity, evaporation and water cycle diagrams, weather and disaster inquiry pages, and more.
You’ll also get math extension and process flow templates. This resource is available individually and is part of the discounted Mega-STEM Challenge Bundle, coming in early May 2018. It will also be part of a new discounted Planetopia bundle. Digital paperless versions for use with Google Slides are also coming soon. Links can be found in the description below the video.
Outro
I couldn’t fit everything I wanted into this video, so I put some bonus content on my blog and the link to that is below. Make sure you’re following and subscribed, as always, I truly hope your weeks has been packed with feel-good teaching moments! See you next time.