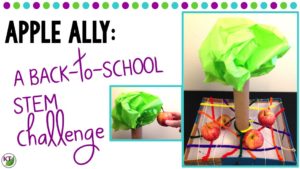
The fourth challenge in the Back-to-School/Fall STEM Challenge series is Apple Ally (see Challenge 1, 2, 3). If you’ve found your way here outside of the back-to-school season, not to worry! These challenges work great for fall apple activities and studies of forces and motion all year long!

Back-to-School/Fall STEM Challenge: In Apple Ally, students build an apple catcher to protect falling apples from damage! This challenge is perfect for studies of gravity, forces, and motion, and includes modifications for grades 2-8.
Premise
Working against a Criteria & Constraints List individually or with partners, students build an apple catcher to protect falling apples from damage! As with all the challenges in this series, materials are the symbols of the fall season: school supplies and apples!
Materials
Sample/suggested materials for each student or group:
Materials you’ll need to do the activity are easily modified.
- Apple (1)
- Large boxes without lids (at least 10 in. x 10 in. – shoe boxes, shipping boxes, etc.).
- Try to get similarly-sized boxes or supplement the materials of groups with larger boxes.
- For increased difficulty, have students build on a cardboard or foam board base (no raised edges)
- Cylindrical object (1)
- Coffee can, paper towel tube, water bottle, rolled file folder, 6 or more pencils tied together, etc.
- Unsharpened pencils (10 – 12)
- Pipe cleaners (10)
- Small and/or large paperclips (20)
- Rubber bands (5 – 10)
- Tape (24 – 36 in.)
- String or yarn (24 – 36 in.)
- Ruler
- Scissors
- Design analysis handouts (included in resource)
Optional:
- Craft sticks
- Foil or lunch bags
- Binder clips
- Decorative green & red paper to build out the tree
Where Can I Find Out More?
If you’re familiar with my work, you know I’ve been switching over to using video to explain the bulk of my challenges. It seems to be the best/fastest way to explain the important details: materials, set-up, tips, modifications, extensions, demonstrations, and more! Who has time to read all that?! However, if you do prefer to read it, you’ll find the video transcribed at the end of this post. 🙂
Resources
Apple Ally is one of the five challenges in the Back-to-School/Fall STEM Challenge Bundle, both linked below.
Video Transcription
Hi guys, and welcome to part four of our Back-to-School STEM challenge series. We’re almost at five, I’m a little bit sad about it. But let’s leave that for next week. We’re on part four, Apply Ally. The premise is that you are gonna have the students build an apple catcher. The first thing they are gonna need to do, is build a tree trunk in the center of whatever their build space is. So I would say, definitely for the challenge you’re gonna wanna use small apples. So we actually probably should pause here, and take a closer look at the materials.
This is the STEM Challenge Cycle you should follow for every challenge. I’ve defined each step in another video. I’ve added a pop-in card to that video here, as well as link in the description. So as you can see, the Criteria and Constraints list is almost deceptively simple. The students are simply going to plant an apple tree and create a catcher that will prevent the apples from hitting the ground when they fall from the tree. You’re gonna wanna give students a good amount of time on this, at least 45 minutes to build, and the students may not pierce or puncture the tree trunk. Now, if you have younger students you can just get rid of that constraint altogether in order to make it a little easier. But if you have older students you might actually want to increase the difficulty.
1:15
Some ideas for that are, to increase the area over which the students are building, so they have to create larger apple catchers. Instead of a box, have them use a foam board, or any flat surface to build upon. And increase the height from which the apples are dropped. And then another idea is to actually give the students four apples, and leave the apples in after each drop, so that when the fourth one is dropped there are already three apples in the catcher. That increases the strain on the design, and leads to some potential bounce-outs of the apples that students need to account for. And this is a great opportunity to study Newton’s third law of motion.
Okay, so I don’t really know if you can see this or not, but I’m just gonna tilt, so you can see this design. So it’s just a lot of cross hatch of strings, and pipe cleaners, and rubber bands, and they’ve been paper clipped along the edges of the box. When the students build their tree trunk, they don’t need to build out the top of the tree or the leaves, but some students are gonna want to, and it looks nice. So, no harm, no foul.
2:10
You wanna schedule 90 minutes for it, and you wanna have some spare apples on hand, and the reason for that is, they’re gonna be closely observing, before each drop of the apple, to see if there are any scratches or dents, and as they’re building and testing things could get damaged along the way, so just have a few on hand extra.
One way that you can test this is actually, partner up different groups. When teams partner up they’re more careful to test in four different zones of the design, and they’re also more likely to look for flaws that they want to exploit.
2:43
Then decide how you wanna measure success. So the way that I originally intended, and wrote it in, was that you would drop the apple from the height of the tree trunk. If you have younger students, then what I would recommend is having them test by just placing. Just placing the apples in four different sections, and seeing if it stays. And that can be your cross for success. As you want to challenge the students, or as they are older, then you start raising the level from which you drop the apple.
I wouldn’t recommend going higher than the actual trunk of the tree … Maybe with, again, with eight grade students you might have designs that can withstand that, but for the most part you’re gonna be dropping … you can decide. Mark off measurement lines, so just mark off every inch, and then you can have them do tests from different heights. So again, I start with just resting, can you rest the apple in four different spots, and if you can then you go up to the next level. They’re gonna drop the apple and see if it falls through. Mine did.
So after each drop, if your students only have one apple they’ll need to fish out the apple every time, and if you have some extra apples then you can just give them four, because they’re gonna be doing four drops.
4:08
So you’ve probably noticed by now that we have a theme going. Of course when I thought back to school, I thought apples, and when I thought apples, I thought Isaac Newton. And then, of course, when you think Isaac Newton you have to think about the laws of motion, which is why so many of these challenges incorporate those laws of motion in.
So again, you’re gonna wanna take a look for your cross-curricular standards, and get as much juice for the squeeze as you can out of each STEM challenge.
If you wanna save yourself prep time and planning time, take a look at the resource.
4:55
This resource contains everything you need, including modifications for use with second through eighth graders. You’ll still need to gather the simple materials of course, but the rest has been done for you. You’ll get Aligned Next Gen Science Standards for Engineering and Physical science, links to my STEM challenge How-To videos to help you get the most from each challenge, and the Apple Ally Materials List.
In Teacher Tips you’ll find premise and setup, how to increase or decrease difficulty through the Criteria and Constraints list, measuring results, and cross-curricular extension suggestions, including links to videos to help you and your students understand more about Newton’s laws of motion. You’ll find an editable Criteria and Constraints list, so you can tailor the challenge to your students.
5:30
For student handouts there are two versions, four-page, expanded room for response, for younger students, and a two-page, condensed space, paper saver version. You’ll also find a set of group discussion questions. In the Extension Handouts you’ll find estimated measure mass handouts, as well as task card templates for student made questions related to the challenge. Use them for a game of SCOOT, a center for early finishers, or an option for sub plans. You’ll also receive two apple writing templates, and math extension and process flow templates. This resource is available individually, and as part of the discounted Back-To-School, and Mega STEM challenge bundles. For one to one paperless classrooms, a version for use with Google Slides is coming soon. Links can be found in the description below the video.
All right, so I hope that you really liked Apple Ally, and that you try it with your students. And just be aware that this is a tricky one, this is challenging, so give your students some extra materials here, and give them some extra time, but don’t shy away from the hard challenges, this is where all the good stuff happens. Make sure you like and subscribe. Next week we’re gonna be talking about our fifth of five, it’s called Apples Ahead. See you next week.


