By now, I hope you’re home enjoying a well-earned Winter Break! Maybe you’re sipping on some hot chocolate, looking for some engaging ways to get your kids thinking deeply when you return to school. Keep this winter STEM activity in your back pocket! Wait for one of those tough days when you and your students need to shake the winter blues, and bust this out! This marshmallow STEM challenge provides a terrific change of pace and your kids will love it– even if you choose not to go the messy route!
Premise
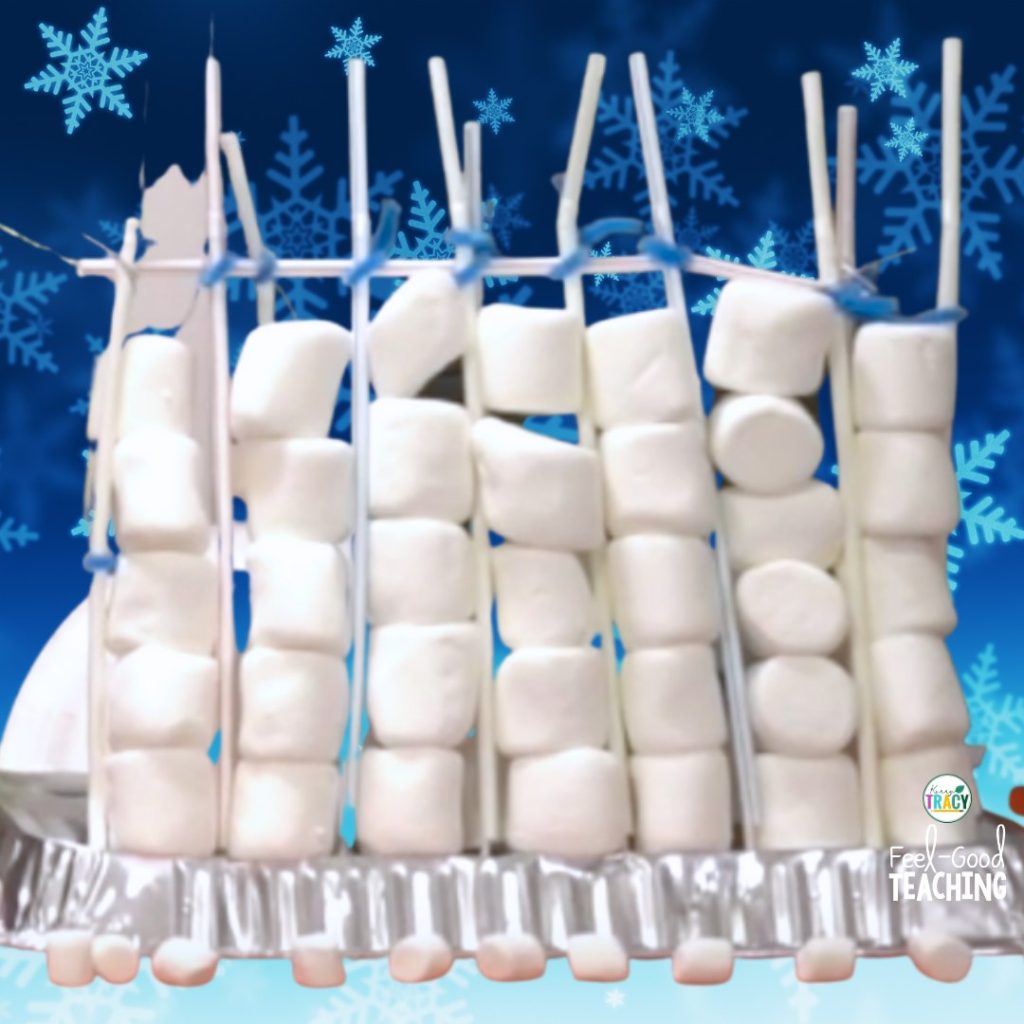
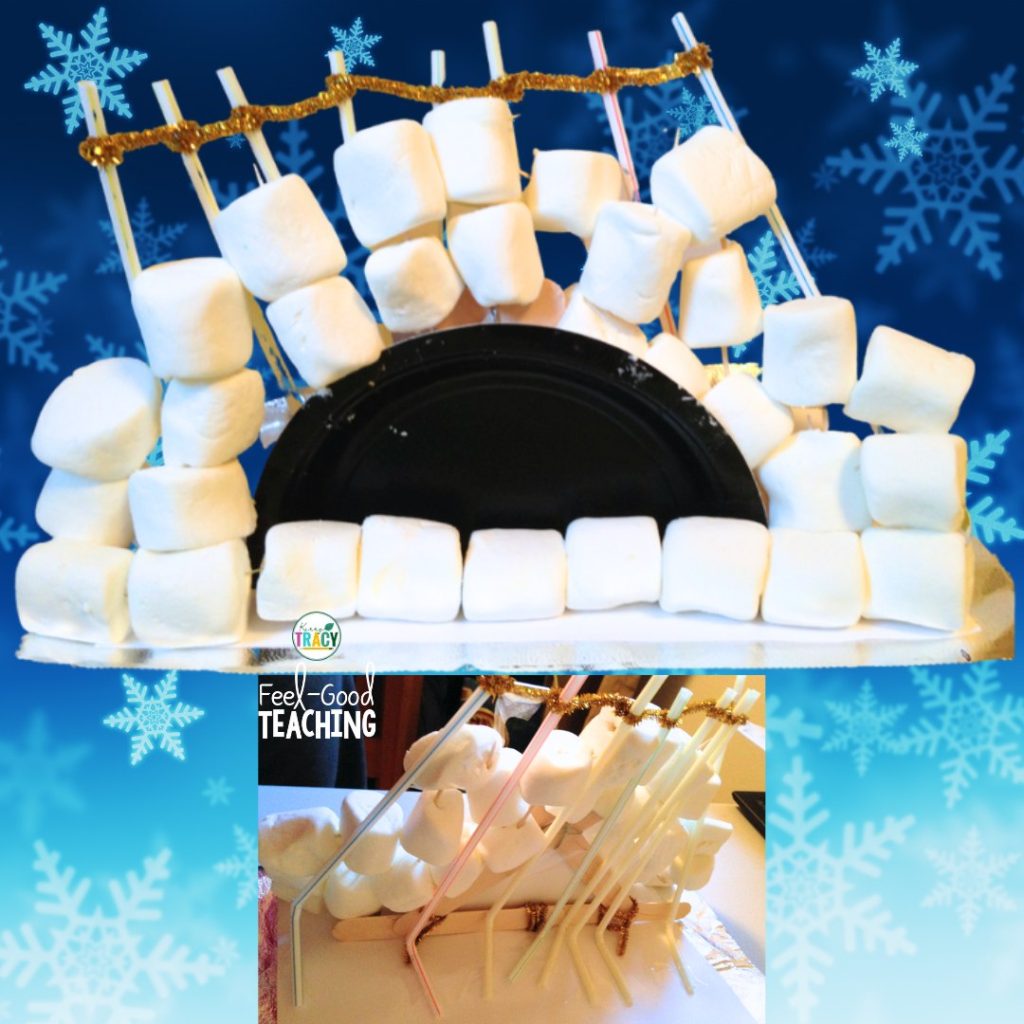
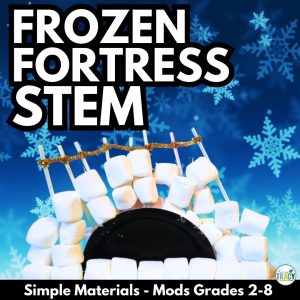
In this marshmallow STEM challenge, Frozen Fortress, students build a fortress wall, aiming for the biggest – and most stable – wall possible! Size can be measured by # of marshmallows used, area, or volume. Stability will be tested through a “snowball” attack from an opposing team. Note: you can also use blocks instead of marshmallows to avoid the food mess and waste.
Materials Needed for Marshmallow STEM Activity
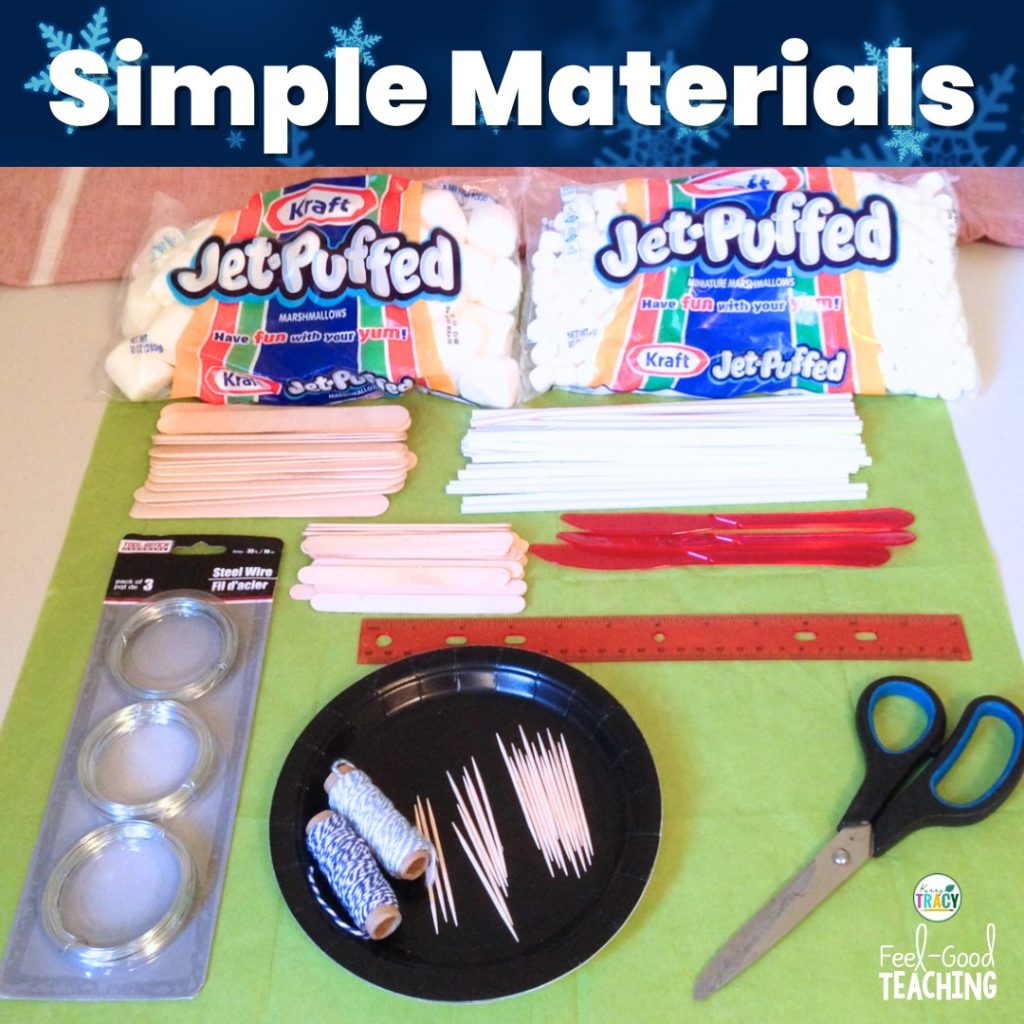
The list of materials you’ll need is short and easily modified, making this winter STEM activity simple to incorporate with very little need for additional prep. You’ll need:
- Marshmallows: large, mini, or a mix (35 – 50)
Sugar cubes or blocks can be substituted for building the fortress wall, but at least one marshmallow per student will still be needed for a “snowball” attack. - Straws (10 – 15)
- Popsicle/craft sticks (10 – 15)
- Toothpicks (25 – 50)
- Small paper plates (1 or ½ of one)
- Ruler
- Scissors
- Work mat (construction paper, foil, newspaper, etc.)
Optional Materials
- Plastic knives, forks, and/or spoons
- Pipe cleaners
- String
- Foil
- Spool of wire (gardening or steel)
- Tape
Where Can I Find Out More?
As you may already be aware from using my other winter STEM activities, I’ve found creating video walk-throughs of my STEM challenges is the best way to explain the important details: materials, set-up, tips, modifications, extensions, and more! Check out the video below to learn more about the winter STEM challenge, Frozen Fortress. However, if you prefer to read, you’ll find the video transcribed at the end of this post.
Social Distance & Distance Learning Modifications:
Are There Other Christmas/Winter STEM Challenges Like This?
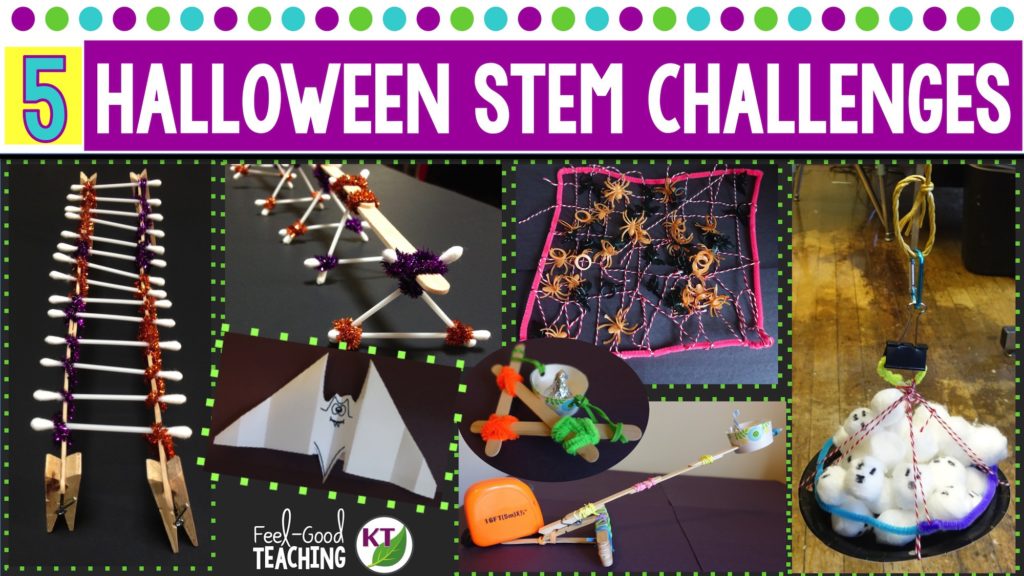
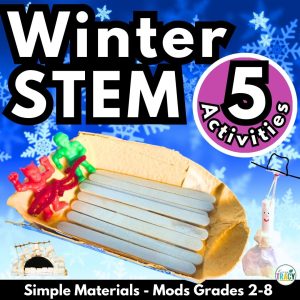
Of course! I can’t help myself! You’ll find all five of the Christmas/Winter STEM challenges I’ve created in the 5-challenge bundle briefly described in this post. Each challenge post is linked there for the walk-through videos and more details. You can also find this Winter and Christmas STEM activity alone (top left) or in a bundle of 5 Christmas and Winter STEM activities (top right). You may also like the Late Winter STEM Activities Bundle & the Valentine’s Day STEM Activities Bundle. Please reach out with any questions and tag me in photos of your students’ work on Facebook & Instagram if you want to give me a smile this holiday season!

You can also find this Christmas/Winter STEM challenge, Frozen Fortress, on Etsy!
Related Posts:
Video Transcription
Hi there, and welcome to our final official Christmas winter STEM Challenge. Although I do have a few new ideas kicking around, so I think I might have some new ones for you in January, but for today we are going to be talking about Frozen Fortress. In this one, the students are building to two main criteria.
The first is about area, or you can choose just height or length, or you can even go for volume, but basically we have a size criterion. Then we’re also looking for a stability criterion, so it needs to be able to withstand a snowball attack, but before I get ahead of myself, let’s take a second to look at the materials and the STEM Challenge Cycle.
This is the STEM Challenge Cycle you should follow for every challenge. I’ve defined each step in another video. I’ve added a pop-in card to that video here, as well as a link in the description. One thing you might want to think about is if the students are building on their desks, is to wrap those desks maybe with newspaper or construction paper.
You could also just use a 9 by 12-inch construction paper. What I’ve done here is taken one of these pans, and this one is 12 and 1/4 inches long. I’ve found that this is a fun thing to build on, so it gives them an option of sticking something through to add a little bit more support.
1:21
This one can become sort of a sticky mess, but there are ways around that. First of all, if you’re just going to go for it, that’s awesome. Just go for it. If you don’t have a sink in your room, make sure you just have some wet wipes on hand. But if you don’t want it to become a sticky mess and you’re worried about that, add a constraint to not be able to pierce the marshmallows, or to only have a certain number of marshmallows that they are allowed to actually pierce through with wire or toothpick, or whatever other materials you might be using. That will add to the difficulty, but it will decrease the mess.
You’ll notice I added a few other materials here. I don’t think I had pipe cleaners in the picture, and the reason for that is pipe cleaners, if I’m piercing the marshmallows, just makes it stickier and messier, more difficult. So I used wire when piercing marshmallows, and they aren’t all pierced. I was also thinking since it is the Christmas season that Christmas hooks might be a really good material to add to this. These ones that I got from the dollar store are pretty flexible and pliable, and they aren’t too sharp. So I think this is actually a really good alternative to buying this kind of wire.
2:28
In terms of size of marshmallow, you can choose to give them a mixture of the big marshmallows and the small marshmallows, or just choose one or the other. Let students know ahead of time that they are going to need to reserve a few of their marshmallow snowballs for the attack. They won’t use all of their marshmallows built in the wall, because if they do, they won’t have anything left to attack. Once the wall is built, the students are going to be teamed up with another group, and they will attack each other’s walls with snowballs.
Now, there are a few different ways that you can measure the results of this challenge. First of all, the easiest way probably is just to have students count the number of marshmallows that are used in a fortress wall. You can also have students measure the area of the wall or the volume of the wall, if that’s age and grade appropriate.
You’re going to want to have the students measure their wall before and after the snowball attack. And they can measure the results of the stability of their wall either based on a percentage of the wall that is still standing after the attack, or they can just measure simply how many marshmallows there were pre-attack, and how many they still had standing post-attack.
3:31
Similarly, if you are having the students create an offensive weapon, and you’re having them measure results on that, they can calculate how many total marshmallows from the opposing team’s wall they were able to knock down, or again, they can use a percentage of the wall they knocked down. To make this challenge a little bit more difficult, I would definitely go with using volume measurements, percentage of the wall that is standing pre and post attack. I would add an offensive tool as part of the challenge, and you can even think about adding a criterion to have a working drawbridge, or at the very least, an entrance.
To extend on this one, this is a natural fit for studying medieval times, the castles, the tools. I think it’s also fun to take a look at how igloos are constructed and put together, maybe using some of the information they learn from studying medieval castles and igloos in their second iteration. This next one is a little bit more of a stretch, but when we look at the way that we build shelters and defense mechanisms, that’s a behavioral adaptation of humans. So I would think to use this as a jumping off point to study the physical and behavioral adaptations of polar animals.
4:37
If you’re looking to integrate some Language Arts in this, I would have students try to generate a list of synonyms for cold. Then work those synonyms into a writing piece that can either be describing the great snowball battle between the two teams, or they could describe a winter scene or write a poem or something like that, but using their synonyms for cold. Maybe even in the writing, you don’t allow them to use the word cold.
If you have students create offensive tools in order to conduct the snowball attack, you do want to be very thoughtful about where you are having them set up and where students are allowed to stand. In this case, this is a modified slingshot, and you don’t want students standing where they might get hit with a snowball from a slingshot. I’m going to stand a little bit off camera and attack this fortress wall, and we’ll see how we do.
5:45
A couple of things I just realized I forgot to mention about the snowball attack is whether or not you’re going to just give each team let’s say 10 seconds or 20 seconds, and they’re all attacking at the same time, or if you’re going to give students a set number of throws or tries. What you might do is each person on a team gets 3 opportunities to attack.
You probably noticed that it was a lot more effective to hit the wall with bigger marshmallows, but depending on the tool that the students create, if they are doing an offensive tool rather than throwing, it could go either way, so I would allow the teams to choose.
With that, you have all the basics and you are ready to conduct this challenge in your classroom. But I always like to give you just a little bit more, so check out the resource. Defend your time. This resource contains everything you need, including modifications for use with second through eighth graders. You’ll still need to gather the simple materials, of course, but the hard parts are done.
You’ll get Aligned Next Generation Science Standards, links to my STEM Challenge How-to videos to help you get the most from each challenge, the Frozen Fortress Materials list. In Teacher Tips, you’ll find premise and setup, how to increase or decrease difficulty through the Criteria and Constraints list, measuring results, and cross-curricular extension suggestions.
6:57
You’ll find an editable Criteria and Constraints list so you can tailor the challenge to your students. For Student Handouts, there are two sets based on your challenge goal, defense only or defense and offense. Each set comes with two versions, four-page expanded room for response for younger students, and a two-page condensed space paper saver version.
You’ll also find a set of group discussion questions. In the Extension Handouts, you’ll find a polar animal adaptations research log sheet, synonyms, antonyms, and figurative language handouts, as well as math extension and process flow templates. This resource is available individually and as part of the discounted Winter/Christmas and Mega STEM Challenge bundles. Links can be found in the description below the video.
Make sure you don’t forget to like and subscribe. I will be back next week to discuss how or even if you should be assessing your STEM Challenges. See you next time.
PIN ME!